 photo Gato Azul
Happy Birthday, Spring!
Bon anniversaire, Printemps!
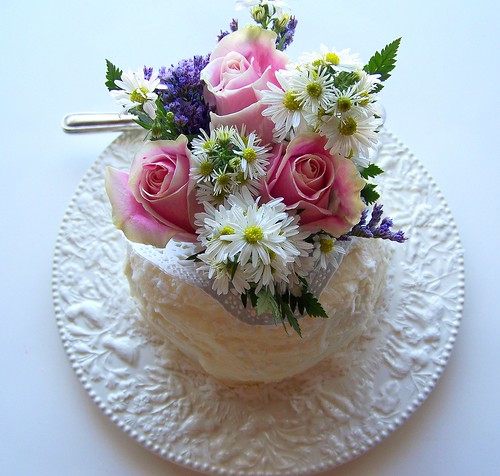
My first Daring Bakers' Event, and I get to bake Morven's suggestion... Dorie Greenspan's birthday cake and eat it too! Up at dawn, this Sunday morning, I got baking... In my family, don't ask me why, birthday cakes are always baked in a bundt cake pan. Now I couldn't break with family tradition, could I? The whole in the middle was perfect to insert a nosegay of spring flowers. The stems of the flowers are encased in some plastic wrap so that they don't actually touch the food, a doily with a whole in the center is wrapped around the flowers.

Mon premier défi Daring Bakers et il faut que je fasse le gâteau de Dorie Greenspan que nous propose Morven (et que je le mange aussi ;-P). Debout aux aurores ce dimanche matin, je me suis mise aux fournaux... Dans ma famille, ne me demandez pas pourquoi, les gâteaux d'anniversaire sont toujours cuits dans des moules Bundt. Impossible de déroger à la règle. Le trou au centre était tout indiqué pour mettre un bouquet de fleurs printanières. Les tiges des fleurs sont placées dans du papier alimentaire en plastique et elles ne touchent pas au gâteau, puis un napperon en papier est attaché autour du bouquet.
 photo Gato Azul
Being diabetic, I cut sugar corners wherever I can, so I made the cake with Splenda, used Première Moisson's exceptional strawberry jam (less than half the carb content from other commercial jams, because they use more fruit) and frosted it with our traditional family buttercream frosting recipe, dusted with coconut.
Diabétique, je coupe les coins ronds lorsqu'il y a du sucre, quand je le peux, j'ai donc fait le gâteau au Splenda, et j'ai utilisé la confiture aux fraises de Première Moisson (elle contient moins de la moitié des glucides des autres confitures commerciales, puisqu'ils y mettent plus de fruits) et j'ai glacé le gâteau avec notre recette de crème au beurre familiale et je l'ai saupoudré de noix de coco.
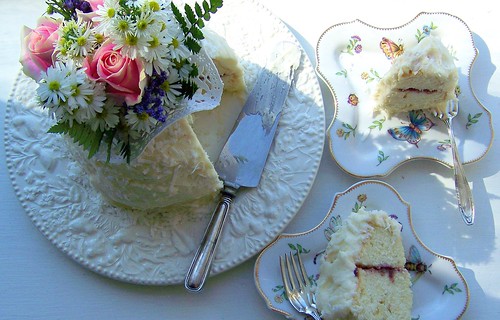
The cake came together quite well but I was worried by the texture of the batter. It seemed very elastic and spongy. Then I remembered that the recipe called for using a spatula to even out the top... perhaps it would be okay, after all... With a bundt cake pan, baking times vary. This cake needed 30 minutes flat baking time. It had risen perfectly. I let it cool for 5 minutes, unmoulded it, and cut a layer about 2/3 from the bottom of the cake (I could have split it into additional layers but I was cutting sugar corners again). I separated the 2 cake layers and let them cool before I spread the strawberry jam, without a layer of frosting (cutting sugar corners again). This is how my mother used to make layered cakes, and the whole experience brought back many birthday cake recipe memories. The cake is very white and it's quite attractive and it's absolutely delicious. For the buttercream and the jam, since we we were encouraged to innovate, as I said before, I used strawberry jam and my family's buttercream recipe.
La préparation de la pâte à gâteau était assez simple mais je me suis inquiétée devant sa texture. Elle semblait élastique et spongieuse. Puis je me suis souvenue que la recette prévoyait lisser le dessus de la pâte à l'aide d'une spatule... je ne devrais peut-être pas m'inquiéter... Avec un moule Bundt, les temps de cuisson sont quelquefois différents. Ce gâteau a nécessité 30 minutes de cuisson. Il a levé merveilleusement bien. Je l'ai laissé refroidir 5 minutes avant de le démouler, puis je l'ai coupé en 2 étages (j'aurais pu faire plus d'étages, si j'avais voulu, mais je pensais à la quantité de confitures). J'ai séparé les 2 étages et je les ai laissé refroidir avant d'étaler une couche de confiture aux fraises entre les deux (je n'ai pas mis de glaçage entre les 2 étages... trop de sucre). C'est la méthode qu'utilisait ma mère lorsqu'elle faisait des gâteaux étagés et ça me faisait me souvenir de bien des gâteaux d'anniversaire. Le gâteau est très blanc et il est très beau et délicieux. Pour le glaçage et la confiture, puisqu'on nous encourageait à innover, j'ai utilisé comme je l'ai déjà dit, de la confiture de fraises et la recette familiale de glaçage au beurre.
Dorie Greenspan's recipe for the perfect birthday cake is at the end of the post...
Pour la recette de gâteau parfait pour les anniversaires de Dorie Greenspan en français, allez chez Rosa ICI
Here is my family's recipe for buttercream...
Voici la recette familiale pour la crème au beurre...
 photo Gato Azul
Ingredients
1/2 lb of butter | 250 g de beurre
1 lb of confectioner's sugar | 500 g de sucre glace
1 tsp of natural almond extract | 1 c. à s. d'extrait d'amande
small quantity of milk to loosen the frosting | petite quantité de lait pour éclaircir le glaçage
Method
Cream the butter with a hand beater or in the food processor, add the almond extract and progressively add the confectioner's sugar. Add enough milk to keep the icing to a spreadable consistency. | Crémer le beurre avec une moulinette électrique ou au robot culinaire, ajouter l'extrait d'amande et progressivement ajouter le sucre glace, ajoutant la quantité nécessaire de lait pour qu'il s'étende bien.
 photo Gato Azul
There was some leftover batter and buttercream so I made some cupcakes. Strange experience to eat a lemon-flavored or blueberry-flavored maraschino cherry.
Il restait de la pâte à gâteau et du glaçage au beurre. Étrange de manger des cerises au marasquin qui ont le goût du citron ou des bleuets.
What a pleasant way to spend a Sunday morning... Thanks Daring Bakers.
Quelle jolie façon de passer un dimanche avant-midi... Merci, Daring Bakers.
 photo Gato Azul
For the Cake
2 1/4 cups cake flour (updated 25 March)
1 tablespoon baking powder
½ teaspoon salt
1 ¼ cups whole milk or buttermilk (I prefer buttermilk with the lemon)
4 large egg whites
1 ½ cups sugar
2 teaspoons grated lemon zest
1 stick (8 tablespoons or 4 ounces) unsalted butter, at room temperature
½ teaspoon pure lemon extract
For the Buttercream
1 cup sugar
4 large egg whites
3 sticks (12 ounces) unsalted butter, at room temperature
¼ cup fresh lemon juice (from 2 large lemons)
1 teaspoon pure vanilla extract
For Finishing
2/3 cup seedless raspberry preserves stirred vigorously or warmed gently until spreadable
About 1 ½ cups sweetened shredded coconut
Getting Ready
Centre a rack in the oven and preheat the oven to 350 degrees F. Butter two 9 x 2 inch round cake pans and line the bottom of each pan with a round of buttered parchment or wax paper. Put the pans on a baking sheet.
To Make the Cake
Sift together the flour, baking powder and salt.
Whisk together the milk and egg whites in a medium bowl.
Put the sugar and lemon zest in a mixer bowl or another large bowl and rub them together with your fingers until the sugar is moist and fragrant.
Add the butter and working with the paddle or whisk attachment, or with a hand mixer, beat at medium speed for a full 3 minutes, until the butter and sugar are very light.
Beat in the extract, then add one third of the flour mixture, still beating on medium speed.
Beat in half of the milk-egg mixture, then beat in half of the remaining dry ingredients until incorporated.
Add the rest of the milk and eggs beating until the batter is homogeneous, then add the last of the dry ingredients.
Finally, give the batter a good 2- minute beating to ensure that it is thoroughly mixed and well aerated.
Divide the batter between the two pans and smooth the tops with a rubber spatula.
Bake for 30-35 minutes, or until the cakes are well risen and springy to the touch – a thin knife inserted into the centers should come out clean
Transfer the cakes to cooling racks and cool for about 5 minutes, then run a knife around the sides of the cakes, unfold them and peel off the paper liners.
Invert and cool to room temperature, right side up (the cooled cake layers can be wrapped airtight and stored at room temperature overnight or frozen for up to two months).
To Make the Buttercream
Put the sugar and egg whites in a mixer bowl or another large heatproof bowl, fit the bowl over a plan of simmering water and whisk constantly, keeping the mixture over the heat, until it feels hot to the touch, about 3 minutes.
The sugar should be dissolved, and the mixture will look like shiny marshmallow cream.
Remove the bowl from the heat.
Working with the whisk attachment or with a hand mixer, beat the meringue on medium speed until it is cool, about 5 minutes.
Switch to the paddle attachment if you have one, and add the butter a stick at a time, beating until smooth.
Once all the butter is in, beat in the buttercream on medium-high speed until it is thick and very smooth, 6-10 minutes.
During this time the buttercream may curdle or separate – just keep beating and it will come together again.
On medium speed, gradually beat in the lemon juice, waiting until each addition is absorbed before adding more, and then the vanilla.
You should have a shiny smooth, velvety, pristine white buttercream. Press a piece of plastic against the surface of the buttercream and set aside briefly.
To Assemble the Cake
Using a sharp serrated knife and a gentle sawing motion, slice each layer horizontally in half.
Put one layer cut side up on a cardboard cake round or a cake plate protected by strips of wax or parchment paper.
Spread it with one third of the preserves.
Cover the jam evenly with about one quarter of the buttercream.
Top with another layer, spread with preserves and buttercream and then do the same with a third layer (you’ll have used all the jam and have buttercream leftover).
Place the last layer cut side down on top of the cake and use the remaining buttercream to frost the sides and top.
Press the coconut into the frosting, patting it gently all over the sides and top.
Serving
The cake is ready to serve as soon as it is assembled, but I think it’s best to let it sit and set for a couple of hours in a cool room – not the refrigerator. Whether you wait or slice and enjoy it immediately, the cake should be served at room temperature; it loses all its subtlety when it’s cold. Depending on your audience you can serve the cake with just about anything from milk to sweet or bubbly wine.
Storing
The cake is best the day it is made, but you can refrigerate it, well covered, for up to two days. Bring it to room temperature before serving. If you want to freeze the cake, slide it into the freezer to set, then wrap it really well – it will keep for up to 2 months in the freezer; defrost it, still wrapped overnight in the refrigerator.
Mon premier défi Daring Bakers et il faut que je fasse le gâteau de Dorie Greenspan que nous propose Morven (et que je le mange aussi ;-P). Debout aux aurores ce dimanche matin, je me suis mise aux fournaux... Dans ma famille, ne me demandez pas pourquoi, les gâteaux d'anniversaire sont toujours cuits dans des moules Bundt. Impossible de déroger à la règle. Le trou au centre était tout indiqué pour mettre un bouquet de fleurs printanières. Les tiges des fleurs sont placées dans du papier alimentaire en plastique et elles ne touchent pas au gâteau, puis un napperon en papier est attaché autour du bouquet.
 photo Gato Azul
Being diabetic, I cut sugar corners wherever I can, so I made the cake with Splenda, used Première Moisson's exceptional strawberry jam (less than half the carb content from other commercial jams, because they use more fruit) and frosted it with our traditional family buttercream frosting recipe, dusted with coconut.
Diabétique, je coupe les coins ronds lorsqu'il y a du sucre, quand je le peux, j'ai donc fait le gâteau au Splenda, et j'ai utilisé la confiture aux fraises de Première Moisson (elle contient moins de la moitié des glucides des autres confitures commerciales, puisqu'ils y mettent plus de fruits) et j'ai glacé le gâteau avec notre recette de crème au beurre familiale et je l'ai saupoudré de noix de coco.
photo Gato Azul
The cake came together quite well but I was worried by the texture of the batter. It seemed very elastic and spongy. Then I remembered that the recipe called for using a spatula to even out the top... perhaps it would be okay, after all... With a bundt cake pan, baking times vary. This cake needed 30 minutes flat baking time. It had risen perfectly. I let it cool for 5 minutes, unmoulded it, and cut a layer about 2/3 from the bottom of the cake (I could have split it into additional layers but I was cutting sugar corners again). I separated the 2 cake layers and let them cool before I spread the strawberry jam, without a layer of frosting (cutting sugar corners again). This is how my mother used to make layered cakes, and the whole experience brought back many birthday cake recipe memories. The cake is very white and it's quite attractive and it's absolutely delicious. For the buttercream and the jam, since we we were encouraged to innovate, as I said before, I used strawberry jam and my family's buttercream recipe.
La préparation de la pâte à gâteau était assez simple mais je me suis inquiétée devant sa texture. Elle semblait élastique et spongieuse. Puis je me suis souvenue que la recette prévoyait lisser le dessus de la pâte à l'aide d'une spatule... je ne devrais peut-être pas m'inquiéter... Avec un moule Bundt, les temps de cuisson sont quelquefois différents. Ce gâteau a nécessité 30 minutes de cuisson. Il a levé merveilleusement bien. Je l'ai laissé refroidir 5 minutes avant de le démouler, puis je l'ai coupé en 2 étages (j'aurais pu faire plus d'étages, si j'avais voulu, mais je pensais à la quantité de confitures). J'ai séparé les 2 étages et je les ai laissé refroidir avant d'étaler une couche de confiture aux fraises entre les deux (je n'ai pas mis de glaçage entre les 2 étages... trop de sucre). C'est la méthode qu'utilisait ma mère lorsqu'elle faisait des gâteaux étagés et ça me faisait me souvenir de bien des gâteaux d'anniversaire. Le gâteau est très blanc et il est très beau et délicieux. Pour le glaçage et la confiture, puisqu'on nous encourageait à innover, j'ai utilisé comme je l'ai déjà dit, de la confiture de fraises et la recette familiale de glaçage au beurre.
Dorie Greenspan's recipe for the perfect birthday cake is at the end of the post...
Pour la recette de gâteau parfait pour les anniversaires de Dorie Greenspan en français, allez chez Rosa ICI
Here is my family's recipe for buttercream...
Voici la recette familiale pour la crème au beurre...
 photo Gato Azul
MY FAMILY'S BUTTERCREAM
CRÈME AU BEURRE, RECETTE FAMILIALE
CRÈME AU BEURRE, RECETTE FAMILIALE
Ingredients
1/2 lb of butter | 250 g de beurre
1 lb of confectioner's sugar | 500 g de sucre glace
1 tsp of natural almond extract | 1 c. à s. d'extrait d'amande
small quantity of milk to loosen the frosting | petite quantité de lait pour éclaircir le glaçage
Method
Cream the butter with a hand beater or in the food processor, add the almond extract and progressively add the confectioner's sugar. Add enough milk to keep the icing to a spreadable consistency. | Crémer le beurre avec une moulinette électrique ou au robot culinaire, ajouter l'extrait d'amande et progressivement ajouter le sucre glace, ajoutant la quantité nécessaire de lait pour qu'il s'étende bien.
 photo Gato Azul
There was some leftover batter and buttercream so I made some cupcakes. Strange experience to eat a lemon-flavored or blueberry-flavored maraschino cherry.
Il restait de la pâte à gâteau et du glaçage au beurre. Étrange de manger des cerises au marasquin qui ont le goût du citron ou des bleuets.
What a pleasant way to spend a Sunday morning... Thanks Daring Bakers.
Quelle jolie façon de passer un dimanche avant-midi... Merci, Daring Bakers.
 photo Gato Azul
DORIE GREENSPAN'S PERFECT BIRTHDAY CAKE
For the Cake
2 1/4 cups cake flour (updated 25 March)
1 tablespoon baking powder
½ teaspoon salt
1 ¼ cups whole milk or buttermilk (I prefer buttermilk with the lemon)
4 large egg whites
1 ½ cups sugar
2 teaspoons grated lemon zest
1 stick (8 tablespoons or 4 ounces) unsalted butter, at room temperature
½ teaspoon pure lemon extract
For the Buttercream
1 cup sugar
4 large egg whites
3 sticks (12 ounces) unsalted butter, at room temperature
¼ cup fresh lemon juice (from 2 large lemons)
1 teaspoon pure vanilla extract
For Finishing
2/3 cup seedless raspberry preserves stirred vigorously or warmed gently until spreadable
About 1 ½ cups sweetened shredded coconut
Getting Ready
Centre a rack in the oven and preheat the oven to 350 degrees F. Butter two 9 x 2 inch round cake pans and line the bottom of each pan with a round of buttered parchment or wax paper. Put the pans on a baking sheet.
To Make the Cake
Sift together the flour, baking powder and salt.
Whisk together the milk and egg whites in a medium bowl.
Put the sugar and lemon zest in a mixer bowl or another large bowl and rub them together with your fingers until the sugar is moist and fragrant.
Add the butter and working with the paddle or whisk attachment, or with a hand mixer, beat at medium speed for a full 3 minutes, until the butter and sugar are very light.
Beat in the extract, then add one third of the flour mixture, still beating on medium speed.
Beat in half of the milk-egg mixture, then beat in half of the remaining dry ingredients until incorporated.
Add the rest of the milk and eggs beating until the batter is homogeneous, then add the last of the dry ingredients.
Finally, give the batter a good 2- minute beating to ensure that it is thoroughly mixed and well aerated.
Divide the batter between the two pans and smooth the tops with a rubber spatula.
Bake for 30-35 minutes, or until the cakes are well risen and springy to the touch – a thin knife inserted into the centers should come out clean
Transfer the cakes to cooling racks and cool for about 5 minutes, then run a knife around the sides of the cakes, unfold them and peel off the paper liners.
Invert and cool to room temperature, right side up (the cooled cake layers can be wrapped airtight and stored at room temperature overnight or frozen for up to two months).
To Make the Buttercream
Put the sugar and egg whites in a mixer bowl or another large heatproof bowl, fit the bowl over a plan of simmering water and whisk constantly, keeping the mixture over the heat, until it feels hot to the touch, about 3 minutes.
The sugar should be dissolved, and the mixture will look like shiny marshmallow cream.
Remove the bowl from the heat.
Working with the whisk attachment or with a hand mixer, beat the meringue on medium speed until it is cool, about 5 minutes.
Switch to the paddle attachment if you have one, and add the butter a stick at a time, beating until smooth.
Once all the butter is in, beat in the buttercream on medium-high speed until it is thick and very smooth, 6-10 minutes.
During this time the buttercream may curdle or separate – just keep beating and it will come together again.
On medium speed, gradually beat in the lemon juice, waiting until each addition is absorbed before adding more, and then the vanilla.
You should have a shiny smooth, velvety, pristine white buttercream. Press a piece of plastic against the surface of the buttercream and set aside briefly.
To Assemble the Cake
Using a sharp serrated knife and a gentle sawing motion, slice each layer horizontally in half.
Put one layer cut side up on a cardboard cake round or a cake plate protected by strips of wax or parchment paper.
Spread it with one third of the preserves.
Cover the jam evenly with about one quarter of the buttercream.
Top with another layer, spread with preserves and buttercream and then do the same with a third layer (you’ll have used all the jam and have buttercream leftover).
Place the last layer cut side down on top of the cake and use the remaining buttercream to frost the sides and top.
Press the coconut into the frosting, patting it gently all over the sides and top.
Serving
The cake is ready to serve as soon as it is assembled, but I think it’s best to let it sit and set for a couple of hours in a cool room – not the refrigerator. Whether you wait or slice and enjoy it immediately, the cake should be served at room temperature; it loses all its subtlety when it’s cold. Depending on your audience you can serve the cake with just about anything from milk to sweet or bubbly wine.
Storing
The cake is best the day it is made, but you can refrigerate it, well covered, for up to two days. Bring it to room temperature before serving. If you want to freeze the cake, slide it into the freezer to set, then wrap it really well – it will keep for up to 2 months in the freezer; defrost it, still wrapped overnight in the refrigerator.


30 commentaires:
Your cake is extraordinary! Beautiful! Welcome to DB. Interestingly, my standard buttercream recipe is the same as yours! We LOVE it on chocolate cake.
Wow, ca pourrait etre un gateau de mariage. Tres tres bien fait! Bravo!
Beautiful! You did a fabulous job!
I love the nosegay in the middle. Flowers and cake, it dosen't get much better then that!
That is one happy spring time cake and perfect for any party!
Gorgeous and welcome to DB's!
A marvelous decoration! Extremely pretty! Very well done! Wow!
Cheers,
Rosa
Wow, stunning cake! And what a brilliant way to welcome spring!! Louise, you did GREAT on your first challenge. Welcome to the Daring Bakers. I've bookmarked your buttercream family recipe - sounds delicious.
What a beautiful cake! I love the almond extract idea and think I will try that the next time myself! Great job!
What a beautiful cake! I love fresh flowers on cakes... Welcome to Daring Bakers!
Ann at Redacted Recipes
Si j'avais vu le cake hier... C'est celui là que j'aurais choisi !
wow wow wow!! the use of fresh flowers on your cake add that stunning touch!! this is definitely a perfect birthday cake!! welcome to DB!!
Tu t'es bien amusee on dirait, et le resultat est fort joli. Bon anniversaire au printemps.
That is one stunning cake...welcome to DB's. What a beautiful first challenge!
Superbe....les photos e la recette. Le petites moules a mini-cakes sont super belles.
bises,
Fabrícia.
www.sopavermelha.blogspot.com
A beautiful creation, very well done!!
Your cake is so beautiful...great idea to use the ring and flowers. And your cupcakes are adorable! :)
This is an unbelievably beautiful cake. I can't believe this is your first DB challenge (imagine pouty-face here). Well done!
xoxox Amy
le gateau est superbe, le bouquet annonciateur de printemps tombe à merveille, tu es une fée
Il est vraiment très beau ton gâteau. Quel travail ! Bravo !
Lovely idea!
Apu
http://annarasaessenceoffood.blogspot.com/
Beautiful! I love the flowers!
welcome to the group.
It is just beautiful. LOoks so fresh and tasty.
I love your cake, it is Gorgeous!!!
The idea of using a bundt pan is fun, and the flowers really make it.
Glad that you were able to make modifications to fit your dietary needs. Beautiful job on creating a lovely spring cake.
Lovely presentation on your cake- The bouquet adds such elegance! Welcome to the DBs!
xoxo
Gabi
Lovely cake with beautiful flowers inside. Great job adapting to the low sugar needs! Very impressive first Daring Bakers challenge!
Flûte, je n'avais pas vu ce billet! et je ne sais pas si tu fêtes ton anniversaire ou si c'est pour le printemps! Mais de toute façon, il est magnifique ton gâteau, les fleurs fraîches sont craquantes! Heureux ceux qui goûtent à ta table!
Bises
Your cake looks light and delicious - glad you could make it work with your diabetic diet. I'm definitely going to try your buttercream recipe.
I love the idea of a layered bundt! The photos are just beautiful! Glad you enjoyed it and made your own adaptations.
Publier un commentaire